
Eye Splice Rope
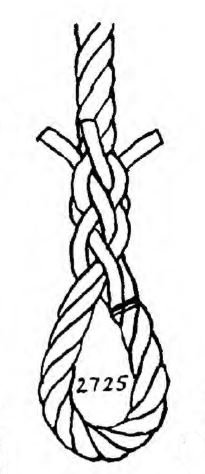
Sailor’s Eye Splice Ashley’s Book of Knots
The Eye Splice is listed in Ashley’s Book of Knots 2725 for your reference. Firstly you will need to separate the three strands of your rope, you want to have the three strands to be long enough to create the desired number of tucks. I find that once I have unravelled enough length of strands, I then tie a Constrictor Knot around the main body of the rope, thereby preventing the rope from unravelling any more.
Number of Tucks for an Eye Splice
The more tucks that you have, then the less chance there is of the tucks slipping when the Eye Splice. If you are using a natural rope then a general rule is, the minimum amount of tucks should be 3 tucks. However, if using a a synthetic line, which can be quite slippery, then as a general rule you should have a minimum of 5 tucks.
Creating the Eye of a Splice
Now that your 3 leads are unravelled to the correct length, you will then need to bring rope together to form an eye, where the constrictor knot is tied will be where the eye is woven into the main body of the rope. The next thing that you will need to do is open up the top twist of rope and then pass the first strand through that opening. You may find that if your rope is hard laid, then a tool such a a Swedish Fid will help to open up the lay. I think the video below will best demonstrate the opening up of the rope and tucking in each piece.
Even Tucks Around the Eye Splice
Once you have completed your first tucks, they should be coming out of the main body evenly spaced and in a straight line around the main body of the rope. The second tuck then goes over the first strand to it’s left and then under the second. This is then repeated on the other two strands. Now check again to ensure that all three strands are evenly coming out of the main body of the rope. Then Repeat on all three strands again. Remember if you are using natural rope then you will need to do a minimum of 3 sets of tucks and 5 for a synthetic line.
Tapering an Eye Splice
Some people prefer to have their eye splice with a taper. This involve cutting away some of the strands from the three lines after each tuck. I would say, you may need to increase the number of tucks, as reducing the size could reduce the strength of the eye splice.
Finishing Off Your Eye Splice
If the ends have been cut to the correct length, they can be incorporated/tucked into the splice. You may also consider whipping the ends of the tuck just where they exit the main body of the rope. Some purist would say that they are better tucked away, as they are less likely to catch. I personally enjoy seeing a bit of coloured whipping, as I do love a bit of knotting bling.
Swedish Fid to Help with Splicing Rope
A very useful tool that is specifically designed to help with splicing is the Swedish Fid. The tool is designed to separate the strands of a rope, then the hollow or ridge section of the Swedish Fid allows you to pass your tuck under the separated strands. A Swedish Fid is a fairly cheap tool to buy (see table below), but I do find they need a bit of maintenance before first use. When I get a new Swedish Fid, I check the main body for any sharp edges. I often have to give them a bit of a rub with sandpaper to get rid of those sharp edges. Sharp edges will cut into your rope and weaken it.
 | When splicing rope, these are great tools to help you get your strands under the lay of the rope. |
Splicing 3 Strand Rope
In this tutorial you will learn how to splice 3 strand rope. We are planning to do some tutorials in the future on splicing 4 strand rope.


Pingback:Decorative Knotwork by Howard Kanare
Pingback:How to Eye Splice a Rope
Pingback:Sustainable Seascape: The Beauty of Ghost Gear Repurposed