
Ditty Bag Leather Making A PT 1

How to Make Ditty Bag
This blog post is dedicated to Blake my chocolate Labrador, who sadly passed away unexpectedly on the 22/07/2014 during the making of my Leather Ditty Bag. Blake would lay next to me outside; he would absorb the sunshine whilst I cursed how sore my fingers were getting. He was a wonderful friend to have and I feel robbed, as he only lived to eight years of age. Blake was with me when I created my first knotting project, it was purely made for him too – it was his lead!
 It is only pure coincidence that my leather is exactly the same colour as Blake.
Making Leather Ditty Bag
I am lucky enough to live near a leather manufacturer, where they have a room full of hides of different thickness , colours and size. It took me ages to find the right one that I wanted to make into a Ditty Bag. The piece I chose was large enough to make at least two Ditty Bags to the dimensions shown later on.
Ditty Bag Template
I found an old drawing of a ditty bag and decided to make it to those dimensions. So I carefully drew the dimensions onto the leather, ensuring that I was a close to the edge of the hide as possible. This was to ensure that I had a little waste as possible, so as to make another bag or something else.
 The basic shape that I cut out with some sharp kitchen scissors was a rectangle 23 1/2 inches by 14 inches, then a circle 7/12 inches in diameter. Also as shown in the picture below. You will see that I have also marked the excess bits that will be folded over later. However, just bear in mind that the 1 inch Lap on the left will become 1/2 inch on both sides.
Making the Ditty Bag
The first thing I did was to fold over the top edge of the leather. Normally when using canvas I would fold and then fold again to tuck under the frayed ends of the canvas. However, in this case I just folded the top over once, otherwise I felt the leather would be too thick to work with.
I purchased from eBay “2/4mm Overstitch Wheel Leather Sewing Stitch Spacing Paper Craft Tool Roulette”, which I used to mark the leather and give me even spacing when sewing the leather. I am sure that I does have a shorter and better name?
 Also when I folded the top edge of the leather I did also glue the seam. The reason I did this was that I did not want the two layers leather to move when I sewed the top fold-over.
Then with the Sewing Awl I followed the dotted line made by the Spiky Wheel with a fairly fine cotton thread.
Ditty Bag Eyelets
Once I had sewn the top edge of the bag I decided to make some eyes for my cord to pass through. I had some old brass eyes left over from my last bag that I made, I have to say that the brass and the leather did look good together. But I then decided that I would use some cotton thread to cover the eyes with a stitching half hitch.
Stitching the eyes proved to be difficult as I had never done this before. When you look at the bag you can see which was the first hole and the last hole that I stitched. They just got better with practice. I also decided not to un-stitch the first one, as I wanted to keep a record as to how I progressed with the task.
Joining the Two Sides of the Ditty Bag
In order to keep down the thickness of the leather, I decided just to overlap the two sides of the Ditty Bag, one on top of the other. I once again applied some glue to the seam of the bag and then stitched this with a thicker cotton cord. I did also use a very small punch to make the holes through both layers of leather.
 Attaching the Base of the Ditty Bag

The problem I thought I would have in attaching the bottom of the bag would be, if I start at one point and work round I could end up with excess leather. So what I did was temporarily attach one point, then the opposite point of the circle. Then repeat this process until the the whole base was secured to the sides of the bag without leaving a large gap/crease. I then stitched the bag all the way round the seam.
 So here we have the completed ditty bag, yes I know there are no cords attached to the bag. That will come in another post shortly.

Shortly after writing this blog post, I decided that the ditty bag was a little on the plain side. To remedy this I decided to sew a rope base to the ditty bag.

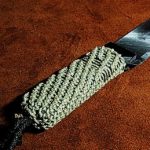
Worming the Rope
The art of wrapping a smaller diameter rope onto a larger rope, in order to fill the valley of the ropes lay is known as worming. What I did was use the technique of worming, but on my way round I also included the base of the bag. So I now wonder if this is now still called worming or is it sewing?

Ditty Bag Rope Base and Worming
Finally farewell to Blake, I miss him so much.


John, Well done the bag looks good, I hope you continue with your knot tying, even without the steady looks from Blake.
I suppose from now the ditty bag it’s self will take over the name of “Blake”
Pingback:My New Knotting Apprentice | IGKT
Pingback:Making the Handle for Leather Ditty Bag