Thump Mat
How to Make a Rope Thump Mat
In this little tutorial you will learn how to make a traditional sailors thump mat. Originally the thump mat was used on sailing ships to protect the wooden decks of the ship from damage from the movement of rigging blocks attached to the decks. In this tutorial, we are going to create a full size thump mat. However, there is no reason why this cannot be scaled down using a finer quality cord or even paracord. Smaller versions of the thump mat do make excellent rope drinks coasters, or a good decorative hot pad mat to protect surfaces from hot cooking pans.
Thump Mat Tutorial
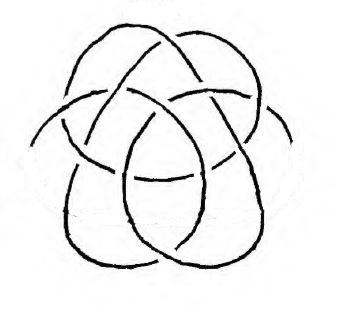
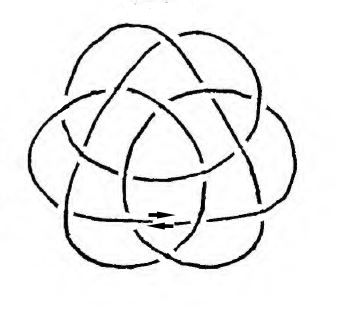
In this Thump Mat Tutorial, I will guide you with photographs and a Thump Mat Plan. The reason the I show you both, is so that you can see that I also do make a mess. The problem with just following a diagram, is that you get so far and then think you have messed it up. So with my actual photos, you will see that I too sometimes think I have messed up. It is rather difficult to make a full size one with out getting all your loops out of place.
Starting your Rope Thump Mat
If you are using rope, then you will need a fairly large area to make your rope mat. If however you are just making one with Paracord or rope of a similar size, then just a tray will do the job fine.
- Get you length of cord and centre it. I find that when making a thump mat , it is easier to centre the rope and start forming the thump mat. By doing this, it just saves pulling a lot more rope through.
- Lay your rope out to form two loops as shown in the pattern and also the photograph. Make sure that where the rope crosses, you go under or over as per the diagram.
- Next, create another two loops under the first two loops, as shown in the diagram. You will at times had to weave the rope under or over at the crossing points. As you start to pull through lengths of rope, your rope loops start to become seriously misshapen.
- The finally weave both ends of your rope to the middle of your mat. and allow the rope to pass each other parallel, but going in opposite directions.
Now you have completed the first pass of your thump mat. Now in turn follow the original leads rounds till you have completed a second pass. The repeat for a third pass.
Rope Thump Mat Plan
Tightening Up the Thump Mat
Once you have decided how many passes you want your thump mat to be, you then need to go round and pull out all the slack and gently tighten up your thump mat. When I say gently, I really do mean gently. Don’t be tempted to try and take out all the slack in one go, as you could end up with a misshapen mat and may have to start again.
Finishing Off the Thump Mat
Once you have a neat and smart looking thump mat, you then need to do something with the two ends of rope. Make sure that they are in line with each other under a crossing point of the mat. You can then slide splice them or apply seizing to keep them in place. How to Seize a Rope, will help you with this process.
Photographs of my Thump Mat Progress
As you can see, starting out is relatively easy. However, after you have pulled the rope through a few times, you feel as though you have failed. Just go round and stretch the 6 loops, so that the mat looks a little symmetrical again. In the last photo, you can see that I have done 4 passes. It is gradually starting to look more like a thump mat should.
Starting out making the thump mat is neat and tidy.
Even when you get to the second step, all still looks good.
The progress of Making the Thump Mat is still looking neat and tidy.
Even at this point the tucks and turns of the Thump Mat are looking good.
Now the turns and tucks are starting to look messy. I would say at this point, take more care than I am! I have made a few different mats, even when it is messy, I can tell if it is right or not. If this is your first time, try to avoid getting into this sort of mess.
With a little bit of work, the rope mat is now starting to look like a mat.
Now it is all coming together, as the mat now has 4 passes. Gently go round and pull up all the slack, then go on to add another or more passes.
Then Finally, you should end up with an elegant Decorative Rope Thump Mat
What are thump mats used for?
Thump mats serve a vital purpose aboard ships, acting as protective barriers for the deck in areas where there’s a risk of heavy objects falling. These mats, as their name implies, absorb the impact of such objects, preventing damage to the ship’s deck. Whether it’s during fuel replenishment or cargo handling operations, thump mats provide a layer of defence, safeguarding the integrity of the deck. Their importance in maritime operations cannot be overstated, offering peace of mind amidst the unpredictable challenges of life at sea.
Thump Mat Material Sizes Used
17 meters of 8-10mm rope is required to make the above mat allowing you to do 5 passes.
Decorative Rope Mat Videos
If you want to watch some Rope Mat Video Tutorials then just click on the link and jump to the YouTube Playlist.
Rope Mats Book
An excellent book on decorative knot work and rope mats, has been written by Des Pawson. There are a few different rope mats with full instructions. You will also be told what size rope you need, the length of the rope required for the number of passes etc. You can find the Book Rope Knot Craft here.
| | Knot Craft and Rope Mats: 60 Ropework Projects Including 20 Mat Designs by Des Pawson Rating: |


Pingback:Collection of Ditty Bags