
Mastering the Double Constrictor Knot
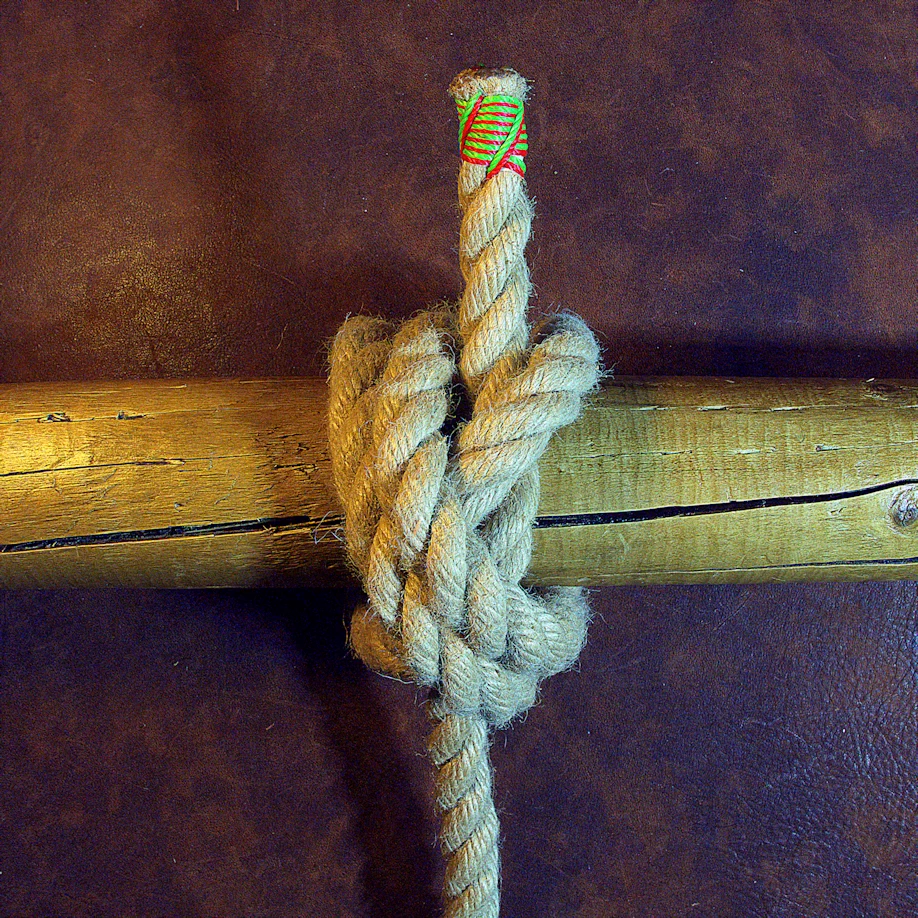
The constrictor knot is renowned for its unyielding grip, but did you know there’s a variation that offers even more security? Enter the double constrictor knot. This knot is incredibly strong and reliable, making it perfect for situations where you need an absolutely secure lashing.
Ready to learn how to tie it? Let’s break it down step-by-step.
In this post< I have included a video, as well as instructions that may also assist you on how to tie the Double Constrictor Knot.
Double Constrictor Knot Video Tutorial
Int his video you will learn how to tie the constrictor knot. However, if you prefer, you can follow along with text instructions, just after the video section.
Tying the Double Constrictor Knot Instructions
For these instructions, imagine your working end (the part of the rope you’re actively using) is on the right, and your standing part (the main, stationary section of the rope) is on the left. This knot can be a bit “cordage hungry,” so make sure you have enough slack!
- First Pass: Take your working end and pass it over the top of the object you want to tie the knot around. Bring the working end to the right-hand side
- Second Pass: Now, pass the working end over the top again for a second time, but this time, take it to the left-hand side.
- Third Pass (and parallel alignment): Go underneath the object, bring the working end over again, and pass it to the right-hand side. You’ll notice that where you’ve gone over, this turn should be running parallel to your previous one.
- Underneath and to the Left: Once those parallel turns are in place, bring the working end through underneath the object and to the left-hand side.
- Over, Under, and Through: Now for the critical part. You’re going to go over the standing part, then underneath the two turns you just created, and finally, underneath the very back turn as well. You might need to lift those turns slightly to get your working end through.
- Tuck and Dress: Before you pull the knot tight, tuck the working end underneath the turn on the right-hand side. This is crucial for the knot’s structure.
- Smart Dressing: Now, gently begin to tighten the knot, making sure to dress it smartly. Don’t pull it too tight immediately! Adjust the knot into the correct position first, then pull it snug.
And there you have it! If you thought the constrictor knot was strong, the double constrictor knot offers an even better, more secure hold. Once dressed smartly and pulled tight, it’s incredibly reliable.
What is the Double Constrictor Knot used for?
Think of the Double Constrictor Knot as the bigger and more secure brother to the Constrictor Knot. The advantage of the Double Constrictor Knot is that it binds exceptionally well, even with slippery rope. It is worth noting that when tied and pulled up tightly, the Double Constrictor Knot can be exceptionally difficult to untie; sometimes a good sharp knife is needed in order to release the knot. Decorative knotters often use the Double Constrictor Knot to hold their strands/work in place. Also, the Double Constrictor Knot can be used as a more permanent tie-down knot or for holding bundles together. Finally, it is worth learning to tie the Double Constrictor Knot, as you will often revert to using this knot for many a securing task.
What is the disadvantage of using the Double Constrictor Knot?
While the Double Constrictor Knot is relatively straightforward to tie, its significant disadvantage lies in how exceptionally difficult it can be to untie. Once cinched tightly, it often grips so firmly that the only practical way to remove it is by cutting the rope.
Do you have a favourite use for the constrictor knot, or are you excited to try out the double constrictor?
 | A Bowline Knot T-shirt that's both stylish and educational! Check out the shop for more knotting T-Shirts. | |
 | A Jury Mast Knot mug that's both stylish and shows the world your love of knots. Check out the shop for more knotting mugs. | |
 | Display your passion for the art of knot tying with this handsome black mug featuring a detailed illustration of the reliable Clove Hitch with Sailmaker's Whipping. | |
 | Knot Mug: Great little present for the person who loves to knot. The mug has a cleat for a handle and comes with a length of rope. |


